> ## Documentation Index
> Fetch the complete documentation index at: https://botcadence-a5dbc408.mintlify.site/llms.txt
> Use this file to discover all available pages before exploring further.
# Support Tickets
> Manage customer issues by enabling, viewing, and resolving support tickets directly from your chat agent.
Support tickets allow your users to submit detailed inquiries or report issues when the AI agent cannot provide an immediate solution. This guide covers how to enable the ticketing system, manage incoming tickets, and resolve them.
## Enabling Support Tickets
To allow your chat agent to create support tickets, you must enable the **Support Ticket Request** tool in your project settings.
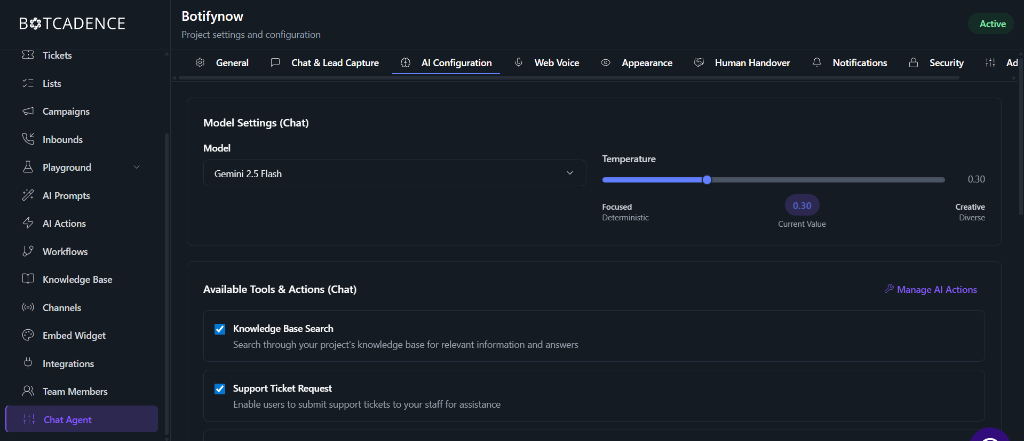 Navigate to the **Chat Agent** section from your project sidebar and click on **Chat Settings**.
Click on the **AI Configuration** tab at the top of the settings page.
Scroll down to the **Available Tools & Actions (Chat)** section. Find the **Support Ticket Request** option and check its box.
Enabling this tool allows the AI agent to recognize when a user needs to file a formal complaint or request human assistance, and it will collect the necessary details (Name, Email, Issue Description) to create a ticket.
Click the **Save** button at the bottom of the page to apply the changes.
## Viewing Tickets
Once a user submits a ticket through the chat agent, it will appear in your dashboard's **Tickets** section.
Navigate to the **Chat Agent** section from your project sidebar and click on **Chat Settings**.
Click on the **AI Configuration** tab at the top of the settings page.
Scroll down to the **Available Tools & Actions (Chat)** section. Find the **Support Ticket Request** option and check its box.
Enabling this tool allows the AI agent to recognize when a user needs to file a formal complaint or request human assistance, and it will collect the necessary details (Name, Email, Issue Description) to create a ticket.
Click the **Save** button at the bottom of the page to apply the changes.
## Viewing Tickets
Once a user submits a ticket through the chat agent, it will appear in your dashboard's **Tickets** section.
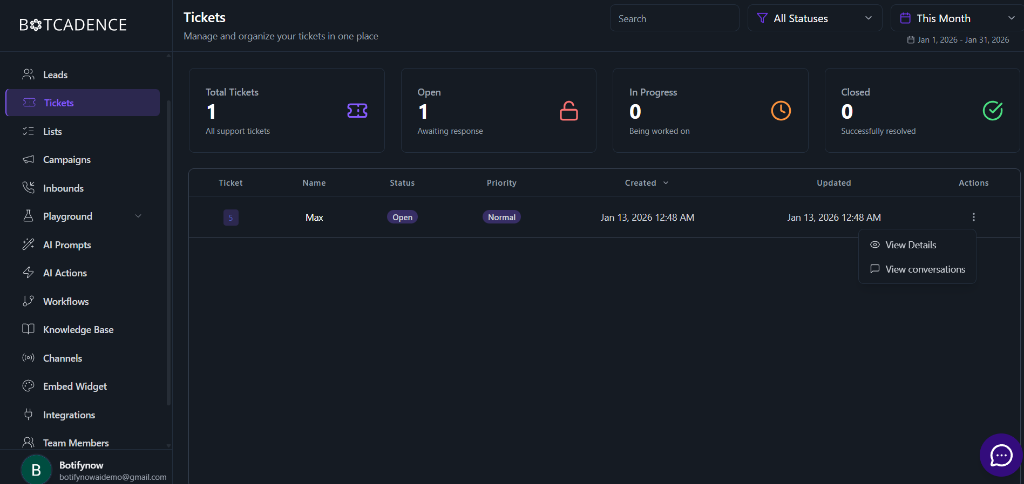 Click on the **Tickets** option in the main sidebar. This page provides an overview of all support requests.
You can view high-level metrics at the top, including:
* **Total Tickets:** All-time ticket count.
* **Open:** Tickets currently awaiting a response.
* **In Progress:** Tickets that are actively being worked on.
* **Closed:** Successfully resolved tickets.
Use the search bar to find tickets by customer name or ID. You can also filter the list by **Status** (Open, In Progress, Closed) or **Priority** (Normal, High, etc.) and time range.
To see the full details of a specific ticket, find it in the list and click the **Actions** menu (three dots) on the right side. Select **View Details**.
Alternatively, you can select **View conversations** to see the chat history that led to the ticket creation, providing valuable context for the issue.
## Resolving Tickets
The ticket details modal allows you to manage the lifecycle of a support request.
Click on the **Tickets** option in the main sidebar. This page provides an overview of all support requests.
You can view high-level metrics at the top, including:
* **Total Tickets:** All-time ticket count.
* **Open:** Tickets currently awaiting a response.
* **In Progress:** Tickets that are actively being worked on.
* **Closed:** Successfully resolved tickets.
Use the search bar to find tickets by customer name or ID. You can also filter the list by **Status** (Open, In Progress, Closed) or **Priority** (Normal, High, etc.) and time range.
To see the full details of a specific ticket, find it in the list and click the **Actions** menu (three dots) on the right side. Select **View Details**.
Alternatively, you can select **View conversations** to see the chat history that led to the ticket creation, providing valuable context for the issue.
## Resolving Tickets
The ticket details modal allows you to manage the lifecycle of a support request.
 In the **Support Ticket** modal, you can review the customer's contact information (Name, Email, Phone) and the **Issue Description** provided by the user.
As you work on the issue, you can update the **Status** dropdown:
* Change it to **In Progress** while investigating.
* Change it to **Closed** once the issue has been resolved.
If the issue is urgent, you can update the **Priority** (e.g., Normal, High) to help your team triage effectively.
Click **Save** to apply your updates. The status will be updated across the dashboard, and the ticket will be moved to the appropriate category in your overview cards.
Regularly monitoring your "In Progress" tickets ensures that no customer request is left hanging. Try to resolve "Open" tickets as quickly as possible to maintain high customer satisfaction.
In the **Support Ticket** modal, you can review the customer's contact information (Name, Email, Phone) and the **Issue Description** provided by the user.
As you work on the issue, you can update the **Status** dropdown:
* Change it to **In Progress** while investigating.
* Change it to **Closed** once the issue has been resolved.
If the issue is urgent, you can update the **Priority** (e.g., Normal, High) to help your team triage effectively.
Click **Save** to apply your updates. The status will be updated across the dashboard, and the ticket will be moved to the appropriate category in your overview cards.
Regularly monitoring your "In Progress" tickets ensures that no customer request is left hanging. Try to resolve "Open" tickets as quickly as possible to maintain high customer satisfaction.